 MCE Video Encoder
Lightning Ware Solutions 2006
| Introduction |
| System Requirements |
| Installation |
| Using the Windows Application |
| Changing the Default Settings |
| Using the MCE Add-ins |
| Registration |
| Advanced Information |
| Custom Profiles |
| Troubleshooting |
MCE Video Encoder is a Windows application that controls encoding and streaming of all video files, including DivX and XVid.
The application also includes a set of add-ins for Windows Media Center Addition 2005 that controls the MCE Video Encoder application.
Therefore, this allows you to not only set up and control video streams from your Windows Media Center PC, but also control and view the streams from a Media Center Extender and even an Xbox 360.
MCE Video Encoder has the following features:
Start and Stop Streaming from Windows Client and MCE Add-in, Pause and Unpause Streaming from Windows Client and MCE Add-in, Rewind and Fast Forward the Streaming (by configurable amount) from Windows Client and MCE Add-in, Play the stream from MCE Add-in, View Progress of video encoding in Windows Client, and Remote control MCE Video Encoder through Windows Messages and/or Command Files.
Windows Application -
MCE Add-ins -.Net 1.0 Windows 2000 or above Windows Media Player 10 or above Windows Media Encoder 9 or above
Note. To stream DivX or XVid videos you will also need the relevant codecs installed..Net 1.0 Windows MCE 2005 or above
IMPORTANT: Prior to installation please uninstall any previous versions of MCE Video Encoder, uninstall the MCE Video Encoder add-ins and remove the "MCEVideoEncoder" folder in your "Shared Documents" folder. Failure to do this may cause issues when using the software.
Before installing MCE Video Encoder please make sure you have installed Windows Media Player 10 (or above) and Windows Media Encoder 9 (or above). You may also want to install any additional codecs (e.g. DivX and XVid) to enable streaming of those video types. We recommend the use of GSpot to determine which codecs are required for your videos.
Next execute the "MCEVideoEncoderSetup.exe" to install the Windows Client application.
Follow through the on screen instructions and restart the computer once installation is complete. Please note that if you are using this system with a Media Center Extender then you must select to install the system for "Everyone" not "Just Me".
Once the computer has restarted log-in to the MCE PC and MCE Video Encoder should load automatically (you should see the MCEVideoEncoder TV icon in system tray as is figure 1).
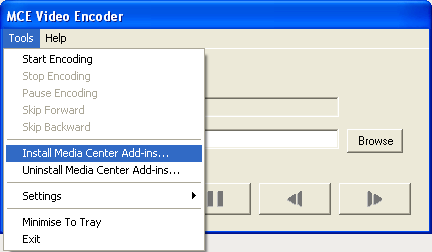
MCE Video Encoder should automatically detect your install status and create all the required files and folders. MCE Video Encoder will also detect the presence of Windows Media Center Edition and prompt you for installation of the Add-ins. This will run a batch file to install the MCE Add-ins. You can also install the add-ins from MCE Video Encoder by double clicking on the TV icon in the system tray top open the Windows Client application (figure 2), and selecting the "Install Media Center Add-ins..." menu item in the "Tools" menu (figure 3).Fig. 1

Fig. 2
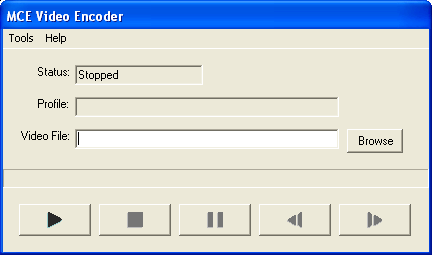
Fig. 3
The application is now fully installed.
Using the Windows Application:
When you log into Windows MCE the application will load and you will see a TV icon (figure 4) in your task bar. Double clicking on this icon will show the main window (figure 5).
Fig. 4
Fig. 5
The status box shows you the current status of the process, the profile box shows you the current streaming profile being used and the video box shows you the current video selected. You can click the "Browse" button to browse for video files.
Once you have selected a video file, you can then use the play button (the first on the bottom left) to start the streaming process (figure 6). The stream will start on the default port of 8080. When the streaming process has begun you will be able to use windows media player or any other compatible player to play the stream at http://thecomputername:8080/.
Fig. 6
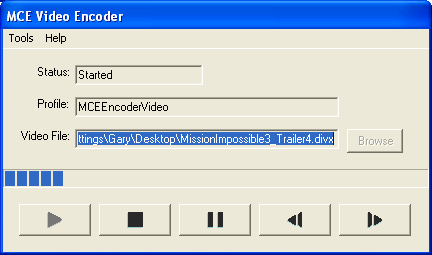
When streaming has started you will see the four other buttons become active. These buttons (from left to right) will: stop the encoding process, pause the encoding process (and resume), rewind the process by a set amount (default of 30 seconds) and forward the process by a set amount (default of 30 seconds). The progress bar indicates the position that the streaming process is at in the current video.
Changing the Default Settings:
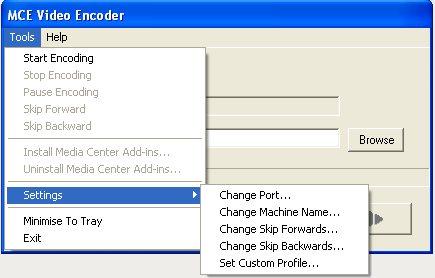
The defaults for the port number, skip forwards time and rewind backwards time can be changed using the "Settings" menu under the "Tools" menu (figure 7).
Fig. 7
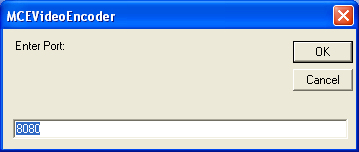
Select the item you wish to change and enter the new value in the pop-up window that appears (figure 8).
Fig. 8
Please note that to use the MCE 2005 add-ins from either an extender or the MCE PC; you must have the MCE Video Encoder Windows application running on the MCE PC. The installation should have installed the Windows application so that it runs when the computer starts up and is logged into, however it can also be started by clicking on the desktop shortcut.
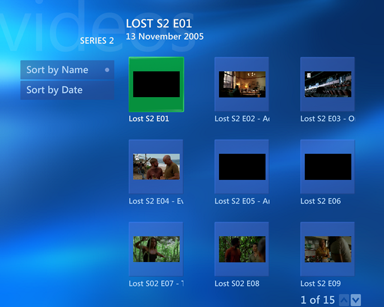
Open the MCE application, navigate to the "Videos" area and then to a video that you would like to play (figure 9).
Fig. 9
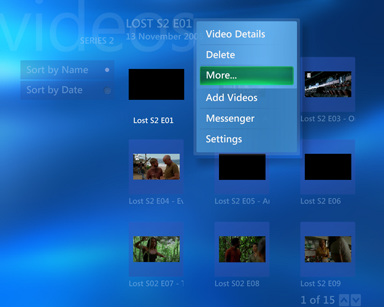
Press the "Info" button on the MCE remote (or right click) on the Video to bring up the information menu and select the "More..." option to navigate to the Add-ins available (figure 10).
Fig. 10
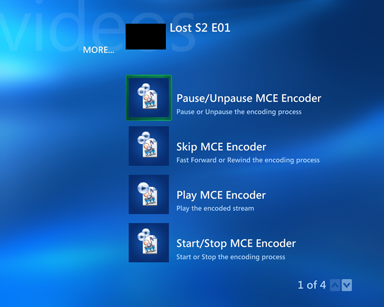
You will see any add-ins that currently exist for your videos, including the four MCE Video Encode add-ins (figure 11):
Start / Stop MCE Encoder - Will begin or end the encoding and streaming process. Play MCE Encoder - Will open the streamed media in MCE player (simulates navigating to http://machinename:port). Pause / Unpause MCE Encoder - Will pause and resume the encoding and streaming process (not the playing of the stream). Skip MCE Encoder - Will rewind or fast forward the encoding and streaming process (not the playing of the stream).
Fig. 11
Please note that stopping, pausing, unpausing, fast forwarding and rewinding of the stream will stop any media that is playing within the current MCE/Extender session. This is to prevent the Xbox 360 freezing when a stream is unexpectedly terminated.
Please also note that the call to the Windows application is timed out at 30 seconds and will return with an error message if the process was not successful within that time. Sometimes if you MCE PC has limited resource the starting and stopping of the stream may take longer than the expected 30 seconds (very rare) and therefore the error message can be disregarded and you may wish to attempt to activate the “Play MCE Encoder” to attempt to play the stream.
MCEVideoEncoder beta is free for private use.
If you like what you see and would like to help contribute to the development process then please donate to:
The MCE Video Encoder windows application listens for both windows messages (use SendMessageW with WM_COPYDATA) and command file (create “command.dat” file in “%shared documents folder%\MCEVideoEncoder\”) to perform its functions. Therefore you can develop your own applications to control the streaming process. The following outlines the messages and commands you need to send the application:
Windows Message -
Function Message Start Encoding 0;[VIDEOFILEPATH]
(Where [videofilepath] is the path to the video file to encode)Stop Encoding 1 Pause/Unpause 2 Forward Skip 3 Backward Skip 4
Command File -
Function Command File Text Start Encoding command;0video;[VIDEOFILEPATH] (Where [videofilepath] is the path to the video file to encode)
Stop Encoding command;1 Pause/Unpause command;2 Forward Skip command;3 Backward Skip command;4
You can obtain the status of the encoding and any error messages returned from a command in the file config.xml in the:
"%shared documents folder%\MCEVideoEncoder\" folder.
MCE Video Encoder can use custom profiles that you can create yourself.
Simply create a new profile with the extension PRX (using Windows Media Encoder or by copying an existing profile and double clicking on it) and copy it into the MCEVideoEncoder folder found in your "Shared Documents" folder.
Now in the MCE Video Encoder (Windows Client application) select "Set Custom Profile" in the "Tools" "Settings" menu (figure 12) and enter the filename (excluding the path and the extenstion e.g. "CustomProfile").
Fig. 12
You get an error message "E3:An attempt to acquire a network resource failed.". This means that the Encoder cannot create a stream on the port that has been set. This could be that you have another application (e.g. a web server) using that port. Simply open the windows client MCEVideoEncoder and using "Tools" - "Settings" - "Change Port..." set the port to another number (e.g. 8182).You get a message "The encoder is." or "E1: MCE Video Encoder Config File could not be located.". This error means that MCE Video Encoder could not see the Windows Client application or the config files. Make sure you have the Windows client started (should see TV icon in system tray) and that you can create a stream with the Windows client without a problem. Also make sure that you have the following directory "%shared documents%\MCEVideoEncoder\" and that it has a file in there called "config.xml".You get a message "Class not registered.". This exception is thrown back directly from the Windows Media Encoder and Windows Media framework. Make sure you have Windows Media Player 10 and Windows Media Encoder 9 installed. Also make sure that any codecs you are using (use GSpot codec info app) are installed and that you have done a fresh reboot of the system.
Gary Stimson - Lightning Ware Solutions