![]() VME Help
VME Help
![]() Table of Contents:
Table of Contents:
Using the Windows Media Center Add-in
Using the Windows Media Center Application
Using the PDA, Simple Web Browser and Advanced Web Browser Applications
VME is a new application that allows you to stream DivX and XviD to your Xbox 360 and Media Center Extender - but it doesn’t stop there! It’s also a complete encoding and streaming suite, allowing you to do such things as stream video from a web browser and PDA, while seamlessly converting your video to MS formats while you sleep!
VME is the evolution of the successful MCE Video Encoder, which has been rewritten from the ground up - creating a new, faster and more feature-rich product.
VME has all the old features of MCE Video Encoder, such as controlling the encoding process from a Media Center Add-in. However, it also brings a lot of new features, including:
· Convert and/or stream your DivX/XviD to WMV: Ideal if you need to view your video on a Media Center Extender, Xbox 360 or PDA
· Vista compatibility: 100% compatible with Vista x86 and x64
· VME Scheduler: Convert your movie collection to WMV while you sleep
· Enhanced windows interface: Includes a start point selector and profile selector
· Windows Media Center Hosted Application: Using the media center, you can control every aspect of the video encoding and set-up your VME scheduler
· Windows Media Center Add-in Interface: Traditional add-in that allows you to instantly start encoding and playing your video on a Media Center Extender or Xbox 360
· PDA Interface: Stream your movies to your PDA or use your PDA to start a stream to your Xbox 360
· Web browser Interface: Stream your movies anywhere through your house using a simple web browser
· Integrated HTTP server: Create your own skins for controlling VME or host a simple HTML application on your local network
· Custom Profiles: You can create and plug-in your own streaming profiles so that you get the best quality from your video conversions
· Distributed system: Install VME on any server in your house and then access it from a media center PC or just install it all on one system
· Full system logging: You can examine logs for the encoder, application and web server
· User friendly installer: Manages the installation of the application, add-ins and web server so that you just need to click ‘next’
· x64 Support: VME comes in either an x86 (32bit) version or x64 (64bit) version
· Watch and Convert: You can choose to convert the video file into WMV and watch the video as it converts
· 32bit codecs on 64bit Vista: Using VME, you can convert and transcode your video to WMV using stable 32bit codecs and therefore avoid the crashing and instability of the x64 codecs on your x64 Vista system and x64 Media Center
· Friendly support: I am happy to answer problems as proved by the success of MCE Video Encoder
Windows Application
· OS: Windows XP all versions, Windows 2003, Windows Media Center 2005, Vista x86 all versions, Vista x64 all versions
· CPU: Minimum 2Ghz Pentium 4
· Memory: Minimum 512 Mb
· Hard Disk Space: 1Gb
Media Center Add-in
· OS: Vista x86 Ultimate, Vista x86 Home Premium , Vista x64 Ultimate, Vista x64 Home Premium
· CPU: Minimum 1Ghz Pentium 4
· Memory: Minimum 256 Mb
· Hard Disk Space: 1Mb
Media Center Application
· OS: Windows Media Center 2005, Vista x86 Ultimate, Vista x86 Home Premium , Vista x64 Ultimate, Vista x64 Home Premium
· CPU: Minimum 1Ghz Pentium 4
· Memory: Minimum 256 Mb
· Hard Disk Space: 1Mb
· .NET Framework – The .NET 2.0 framework or above is required
· Windows Media Player - Version 10 or above is required
· Windows Media Encoder – Version 9 x86 is required is using x86 VME or Version 9 x64 is required is using VME x64
· Codecs – All necessary codecs should be installed. If using VME x64 then the codecs will also need to be 64bit.
Locate and run the VMESetup.msi file as the PC administrator (if you are installing the x64 version then please run VMESetupx64.msi).
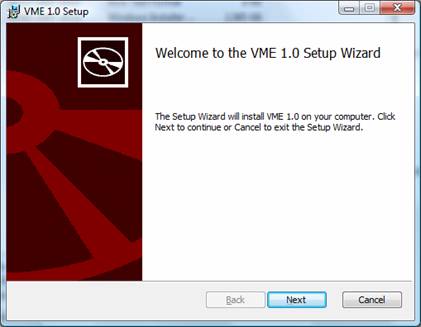
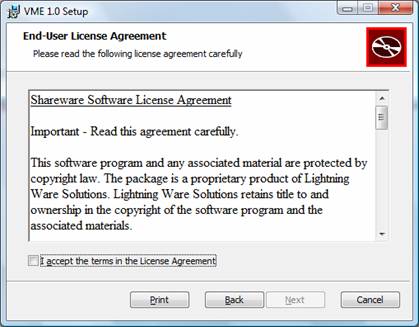
Click “Next” on the welcome screen and click “I agree the terms of the License Agreement” and “Next” on the following screen.
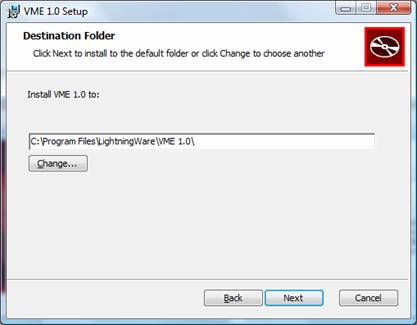
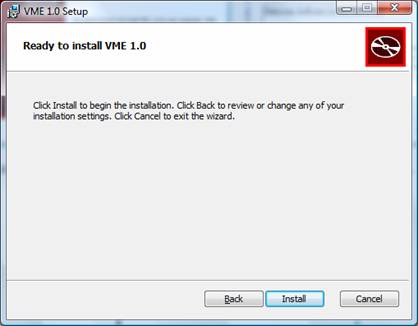
Confirm that the destination directory is correct and click “Next” and then click “Install” on the following screen.
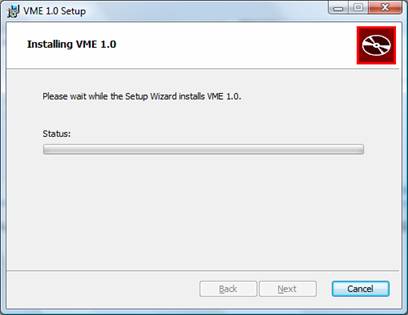

The installation will now begin and the files created. If you are using Vista you may receive a message asking for administrator control, simply click “Allow” on this dialog.
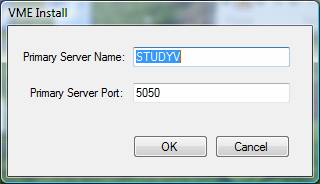
You will then be greeted with a “VME Install” pop-up that asks for the Primary Server Name and Primary Server Port. This application will manage then installation of the VME server and the Media Center add-ins. If you are installing the application all on one PC then simply confirm the values and click “OK”. If you are installing VME on another server to where the Media Center add-ins will be placed then:
1) If you are installing the server part of the application then simply confirm the values are the local machine values and that the port is available and click OK.
2) If you are installing the Media Center add-ins to connect to another server then enter the other servers machine name or IP address and the port you used for that application.
![]()
You will now be greeted with the final dialog in which you click “Finish”. You will also notice that VME Manager is started and a new icon of a clapper board appears in your system tray.
![]() Using
the Windows Application:
Using
the Windows Application:
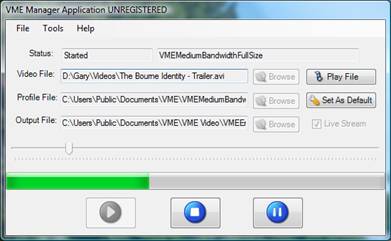
Once VME is started you will see a clapper board icon in your system tray. Simply double click the icon or right click and select the “Show VME Manager” item.
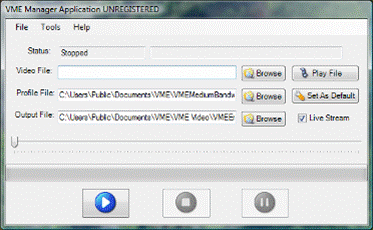
If you have used MCE Video Encoder then the controls are very similar. Click the first “Browse” button to browse for a video file to encode (you can see if it is the correct video by clicking the “Play File” button which opens up the selected video in Media Player).
Then select the profile file you wish to use. The profile file is the settings for the size of the video output and the quality. There are a number of profiles that have been included but you can also create your own or copy existing ones and modify them. You can also use the “Set As Default” button to set the selected profile as the default profile when the application loads.
The output file only needs to be specified to be different to the default if you intend on keeping the converted video file after use. If you are simply converting a video file and not streaming the video across the network you can uncheck the “Live Stream” box. This will dedicate the application to creation of a WMV file and increase the quality of the video. Please remember that you can still watch the video as it is being converted.
You will also notice a new slider control that did not appear in MCE Video Encoder. This slider allows you to select the start point of the video encoding rather than having to skip forwards and backwards until you reach the correct point.
Once you have set all the required fields you can
click the large start button ![]() to being the encoding process.
to being the encoding process.

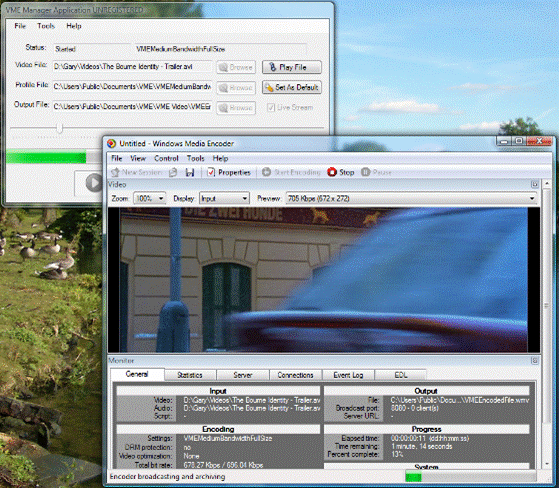
Once started you will see the progress bar
updating and the stop ![]() and pause
and pause ![]() buttons becoming available. These buttons will
stop the encoding process and pause the encoding process respectively.
buttons becoming available. These buttons will
stop the encoding process and pause the encoding process respectively.
You can play the encoding file or stream by selecting “Play Encoded File” or “Play Stream” from the “Tools” – “VME Encoder” menu. From this same menu you can also Start, Stop and Pause the encoder as well as show the Windows Media Encoder engine and the encoding preview with the “Show WM Encoder” button.
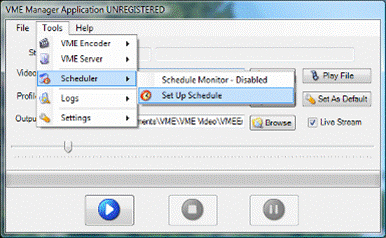
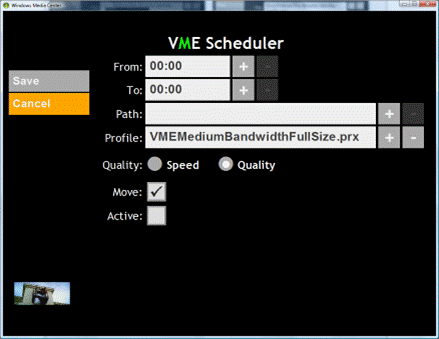
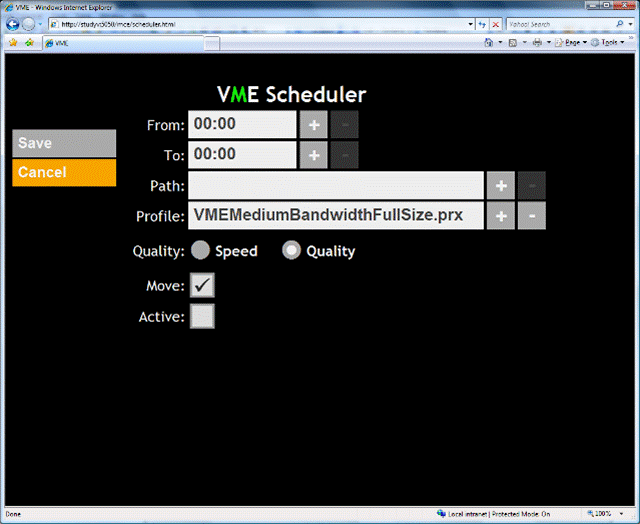
VME has a simple Scheduler that allows you to convert your video collection while you sleep. To set-up the scheduler select “Set Up Schedule” from the “Tools” – “Scheduler” menu.
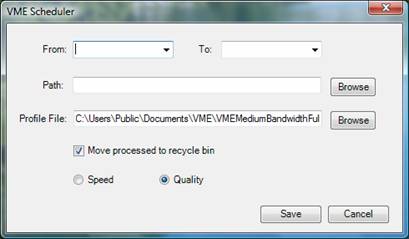
You will be greeted with the scheduler pop-up. Simply specify a start time and a stop time in the “From” and “To” fields and then select the folder you want the scheduler to look for video files in. The scheduler will search through the folder you specify and any sub folders for *.AVI files that do not already have a *.WMV version.
Next select the profile you wish to use for the encoding process and select whether or not you want to move the processed files to the recycle bin.
Finally choose if you want the scheduler to process the files for quality (can take up to 50% longer) or if you want the files to be done as quickly as possible by selecting the “Quality” or “Speed” radio buttons respectively.
Once you are finished click the “Save” button to save your changes.
You can now enable the scheduler by selecting “Schedule Monitor” from the “Tools” – “Scheduler” menu. The scheduler will then run in the background and become activated during the time you specified. When active it will scan the directory you specified and all the sub-directories and process the first *.AVI file it finds with no *.WMV version. Once processed the scheduler will wait for 10 minutes and then process the next file it finds.
VME has many features for power users, which include the web server and logging.
When the VME application is started it will open port 5050 and use this port as its web server communication port. To change this port please see the section below.
Please do not expose the VME port to the outside network. VME has been designed to be used in a secure internal LAN and not on the internet.
You can access the web server by typing the address:
http://[machinename]:[port]/[webpage]
Where [machinename] is the name or IP address of the machine that VME is running on and the [port] is the port that VME is using (default 5050). The [webpage] is any web page that exists in the VME Program Folder/HTML folder (e.g. C:\Program Files\LightningWare\VME 1.0\HTML). An example of accessing the PDA interface is:
http://localhost:5050/pda.html
You can write your own web pages and place them in this folder and also create new interfaces for VME using the existing files as a basis.
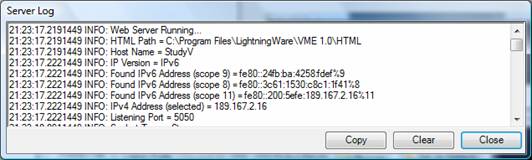
VME includes a full logging system that creates three separate logs for the VME Web Server, VME Encoder and VME Application. If you encounter a problem with VME then I recommend you visit the logs and send me the section that includes the error you are experiencing.
To access the logs select either “VME Log…”, “Server Log…” or “Encoder Log…” from the “Tools” – “Logs” menu.
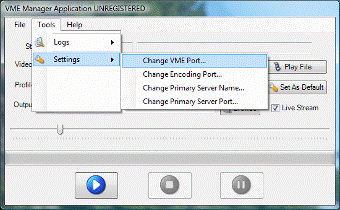
All parts of the VME system are completely customisable from the Profiles to the encoding port.
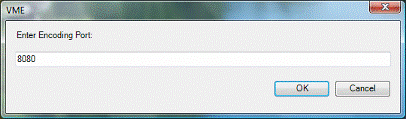
By default VME using port 5050 (see above) as its Web Server port and port 8080 as its video streaming port. If your system is already using these network ports then you can easily change the port assignments my selecting “Change Encoding Port…” and “Change VME Port…” from the “Tools” – “Settings” menu. You will need to restart the application once a change is made.
When you installed VME you were asked to specify a “Primary Server Name” and a “Primary Server Port”. These values are used by the media center add-ins to access VME the sits on any system on your local network. If you decide to move the VME server to another system then you can change the Primary Server Name and Primary Server Port to accommodate this change. Once you have made a change to these settings you will also need to uninstall and reinstall the Media Center add-ins. You can do this by finding the VMEInstallAddin.exe application in the VME program files folder (e.g. C:\Program Files\LightningWare\VME 1.0\) and running it with the “u” parameter. You can do this by opening the windows run dialog and typing:
C:\Program Files\LightningWare\VME 1.0\ VMEInstallAddin.exe u
To reinstall the add-ins simply run the application again without the “u” parameter:
C:\Program Files\LightningWare\VME 1.0\ VMEInstallAddin.exe
Please note that this will reset all the configuration settings for VME. If you want to save your settings locate the config.xml file in the VME public folder (C:\Users\Public\Documents\VME) and create a copy of it. You can then restore the file once you have finished running VMEInstallAddin.exe.
![]() Using the Windows Media Center Add-in:
Using the Windows Media Center Add-in:
Please note that the Media Center Add-in is only available on Vista operating systems. If you are using a Windows Media Center 2005 system then please use the Windows Media Center Application.
The Media Center Add-in has been improved from the MCE Video Encoder application. Rather than having a separate application for each operation we now have one application called “VME Addin” that interrogates the state of VME and the encoding process and responds with the correct dialog.
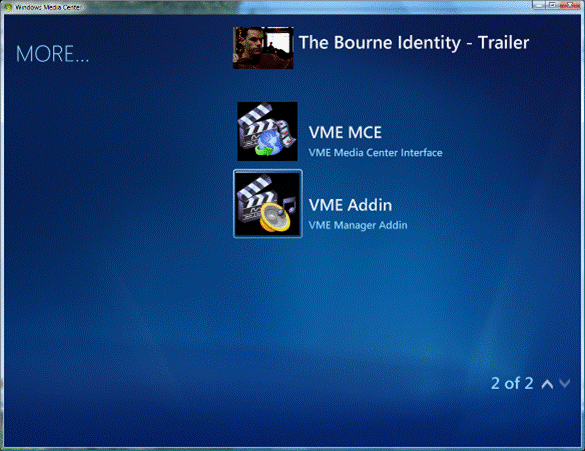
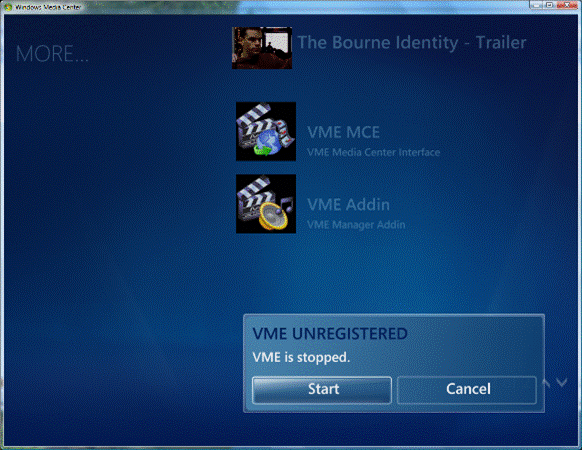
To use the Add-in simply find the video you want to encode in Windows Media Center or the Extenders Media Center and then press the “i" (info) button on the remote or the right mouse button to provide you with the context menu. Then select the “More…” item to show the installed Video context Add-ins. You should then see the two VME add-ins available to you.
Now simply select the “VME Addin” item to activate the application. If the encoder is stopped you will be greeted with a start encoder menu in which you click the “Start” button to start encoding the video.
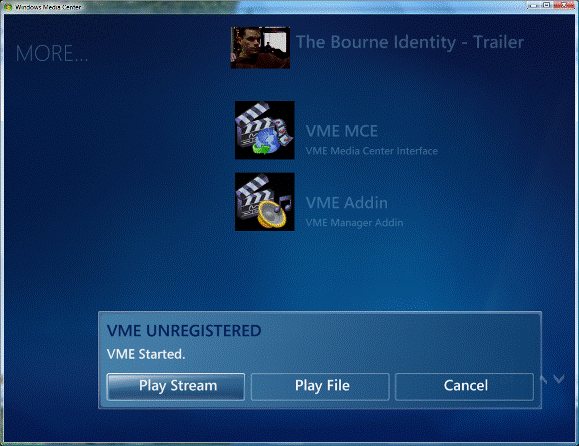
You will then be greeted with dialog stating that the video has started encoding and giving you the option to “Play Stream”, “Play File” or “Cancel”. Please note that if you are on an extender you will not see the “Play File” item on any play dialogs. Also note that if you are not encoding a live stream then you will not see the “Play Stream” button on either the Extender or Media Center play dialogs.
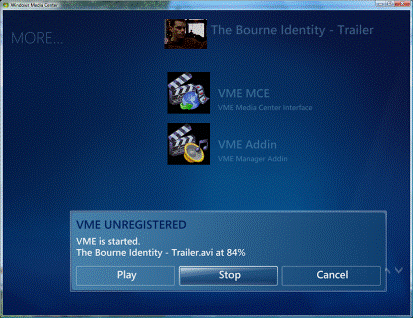
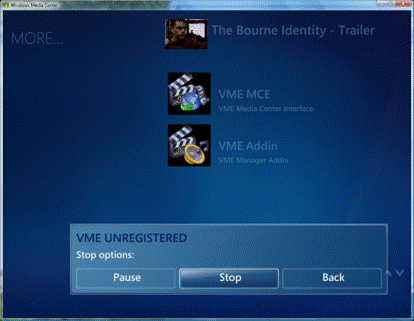
To stop the encoder simply click select the “VME Addin” application again from any video context to be greeted with another dialog. In this dialog select the “Stop” button and then “Stop” in the following stop menu. You can also select the “Pause” button if you wish to pause the encoding process.
![]() Using the Windows Media Center Application:
Using the Windows Media Center Application:
VME provides you with a full graphical application within Media Center to control every aspect of the encoding process and even set up the VME Scheduler using the Media Center remote.
To use the Media Center application, simply find the video you want to encode in Windows Media Center or the Extenders Media Center and then press the “i" (info) button on the remote or the right mouse button to provide you with the context menu. Then select the “More…” item to show the installed Video context Add-ins. You should then see the two VME add-ins available to you.
Now select the VME MCE application to open the user interface.
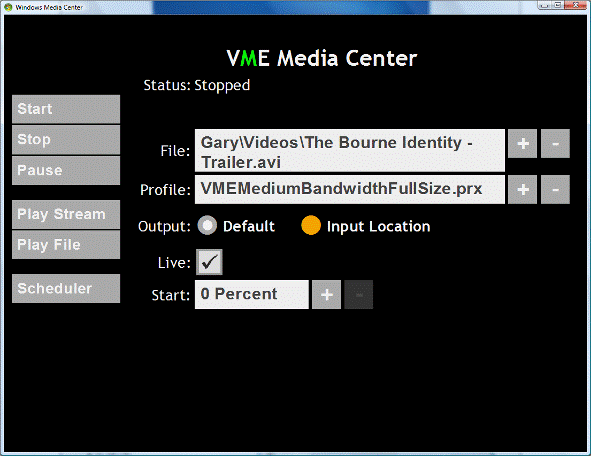
The VME Media Center application will automatically select the file you were in and present you with similar options as in the Windows Application. The application also allows you to use the “+” and “-“ buttons to select any other file that is in any folders registered with the Windows Media Player library. If you cannot see a file in the selector then please make sure you have added it to your library.
You can also select any profiles that are present in the VME shared documents folder (e.g. C:\Users\Public\Documents\VME) and set whether you want to save the created video to the same file name as the selected video or the default file by selecting the “Input Location” or “Default” radio buttons respectively.
As with Windows Application, you can also select whether you want the encoding to be a live stream or just create an encoded file by checking and unchecking the “Live” checkbox.
Finally, you can specify where in the video you would like to start encoding from by using the “+” and “-“ buttons on the “Start” field.
Once you have set the required options, select the “Start” button to begin encoding.
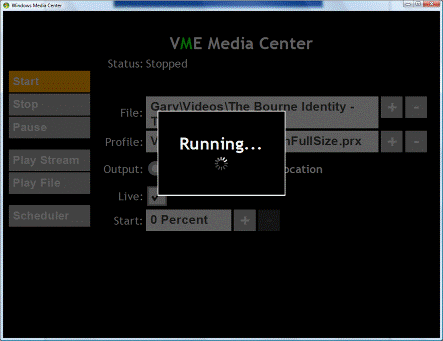

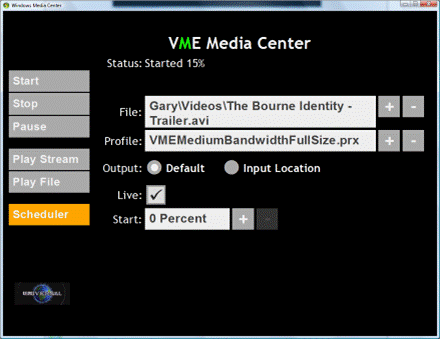
You will be greeted with a “Running…” message which will then return back with the “Started” status and a continual percentage complete message.
You can choose to play either the encoded file or the stream by selecting the “Play File” and “Play Stream” buttons respectively. If you are on a Media Center Extender from a Vista Media Center then the “Play File” button may return an invalid video type until it has finished encoding the video. If this is the case then simply use the “Play Stream” button instead. Also, if you have not selected a live stream then the “Play Stream” button will return a message to indicate that no stream is present.
As mentioned earlier, you can use the “Scheduler” button to open up another interface to set up the scheduler options.
![]() Using
the PDA, Simple Web Browser and Advanced Web Browser Applications:
Using
the PDA, Simple Web Browser and Advanced Web Browser Applications:
The power of VME is that it can be controlled remotely through any web browser on your network. This means it can be accessed from a PDA, Mobile Phone or PC Web Browser.
PDA Interface:
To access the PDA interface simply enter the following URL into a web browser on your PDA:
http://[machinename]:[port]/pda.html
Where [machinename] is the name or IP address of the machine that VME is running on and the [port] is the port that VME is using (default 5050). An example of accessing the PDA interface on a server called “studyv” would be:
http://studyv:5050/pda.html
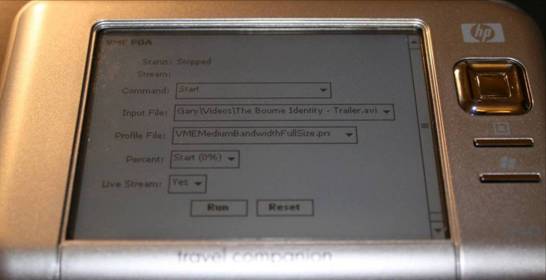
Once the page has loaded you will see a similar set of fields to the Windows and Media Center applications. Simply select the action you wish to perform (Start, Stop or Pause) in the “Command” drop down, the input file in the “Input File” drop down, the profile in the “Profile File” drop down, the start percentage/point in the “Percentage” drop down and finally if the stream is live or not in the “Live Stream” drop down. Like the Media Center Application the input file options are generated from the *.AVI files found in your Media library and the profile file options are generated by the profiles found in the VME shared documents folder.
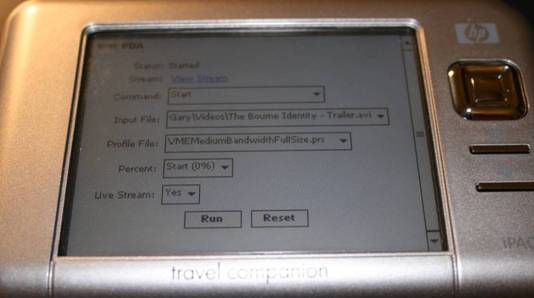
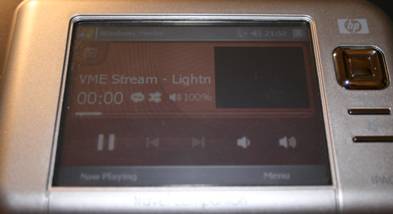
When you have specified all the required fields you can then click the “Run” button to run the command and start the encoder. You can then click the “View Stream” link that appears when the page reloads to view the video stream on your PDA.
Alternatively if you don’t have a Media Center PC you can use this interface as a nice way of remotely controlling VME so that you can watch DivX and XviD on your Xbox 360. Simply add the VMEEncodedFile.wmv found in VME/Video shared documents folder (e.g. C:\Users\Public\Documents\VME\VME Video) to your Media Player library, to see the video on your Media sharing connection on your Xbox 360.
Simple Web Browser Interface:
To access the simple web browser interface which is compatible with every browser application, simply enter the following URL into the web browser:
http://[machinename]:[port]/default.html
Where [machinename] is the name or IP address of the machine that VME is running on and the [port] is the port that VME is using (default 5050). An example of accessing the interface on a server called “studyv” would be:
http://studyv:5050/default.html
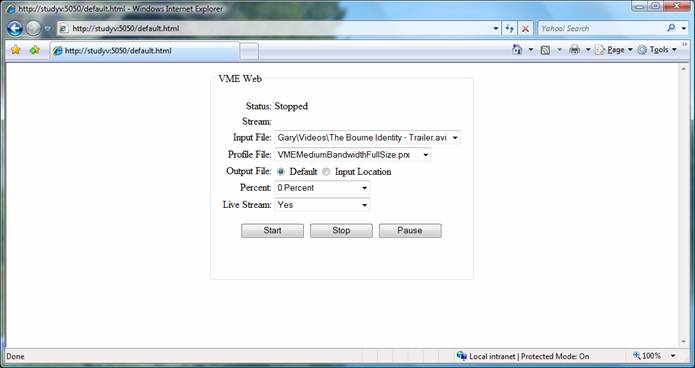
In a similar way to the other interfaces simply select your input file, alter the required fields and then click the “Start” button to begin the encoding.
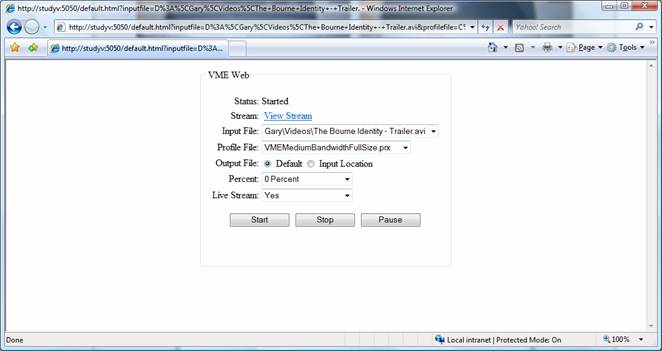
You can then click the “View Stream” link the reloaded page to view the video stream that has been created.
Advanced Web Browser Interface:
VME also provides you with an Internet Explorer only advanced browser that looks identical to the Media Center Application. To access the advanced web browser interface which is compatible with every browser application, simply enter the following URL into the web browser:
http://[machinename]:[port]/mce/default.html
Where [machinename] is the name or IP address of the machine that VME is running on and the [port] is the port that VME is using (default 5050). An example of accessing the interface on a server called “studyv” would be:
http://studyv:5050/mce/default.html
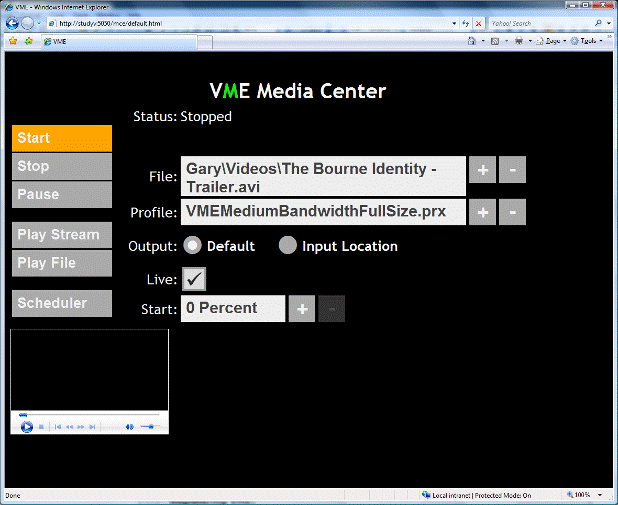
As with all the other interfaces, you can specify the input file and the required options and click “Start” to begin encoding.
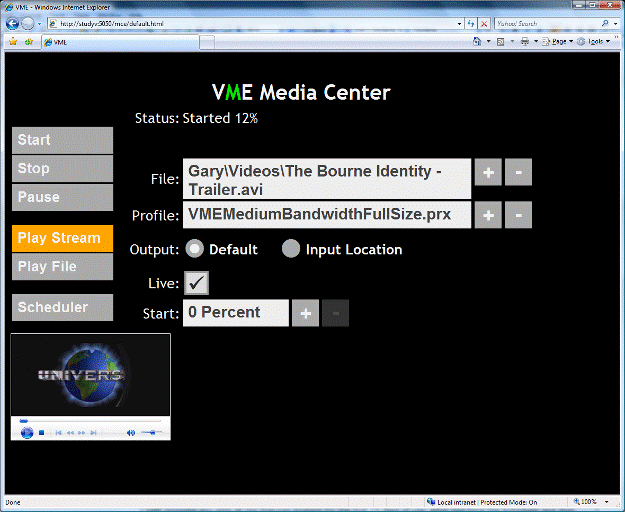
Once started, you will get a continuous update on the encoders status and the percentage completion. You will also be able to see the video stream or file in the embedded Windows Media Player™ control by clicking the “Play Stream” or “Play File” buttons.
As with the Media Center interface you can also click the Scheduler button to set up the VME schedule in the browser.
VME has a small registration cost if £3.99. This is to cover the amount of work and support that has gone into VME and MCE Video Encoder. I was finding that even though I was answering lots of support emails a night and have had over 100,000 users using MCE Video Encoder, only a handful contributed to development by donating.
If you feel that the small amount of £3.99 is too much then please feel free to use the freeware MCE Video Encoder application.
VME provides you with all the features enabled for the first 15 days of use. After this time the Scheduler and Web Server will be disabled.
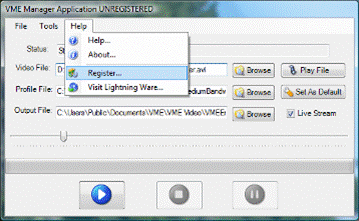
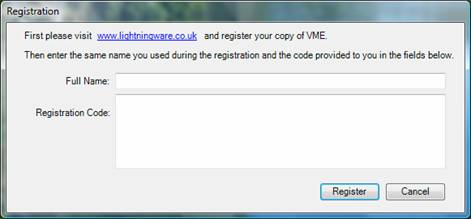
If you decide to help support and register your application then please visit the software page for VME and purchase a license code. This code will then be sent to you within 24 hours. Once you have this code simply select the “Register...” from the “Help” menu and enter the full name you used to register VME and the registration code you were provided.
With such a complex program with dependencies on so many different codecs there are bound to be occasions when problems occur. Please view the troubleshooting tips below and if you are still stuck please feel free to contact me (Gary Stimson) at VMESupport@lightningware.co.uk.
Encoder Error: Attempted to Read or write protected memory.
From = Windows Media Encoder
Cause = Invalid Codec Configuration
Tips = I found I got this when I first installed FFDShow. I had to change FFDShow audio configuration to disable the mp3 codec and change FFDShow video configuration to use libavcodec for all Mpeg 4 video types. This error is due to the wrong codec being used for the audio and video data so you may find that you have to tweak your codec configuration to find the optimum codecs. Visit www.free-codecs.com to find the latest codecs and the GSpot tool which can tell you what codecs are required.
Video starts to encode then immediately stops.
From = Windows Media Encoder
Cause = Invalid Codec Configuration
Tips = I found I got this when I was using the wrong codec. I simply changed FFDShow to use libavcodec for Mpeg 4 and the video started to encode correctly. As with problem 1 try to find the latest codecs that the GSpot tool states you require. You then may have to tweak with the codecs to find the best configuration.
Video does not move to the correct start point when the start percentage is changed.
From = Windows Media Encoder X64
Cause = Bug in XviD x64
Tips = There is no workaround at this time until a more stable x64 Vista XviD codec is released. I would recommend using the 32 bit version of VME instead.
VME Manager crashes on second attempt at encoding a video.
From = Windows Media Encoder x64
Cause = Bug in XviD x64
Tips = There is no workaround at this time until a more stable x64 Vista XviD codec is released. I would recommend using the 32 bit version of VME instead.
VME Error: You do not have one of the required components installed…
From = VME
Cause = You either do not have Windows Media Encoder V9 installed or Windows Media Player ™ Version 10
Tips = Download and install the required applications. Please remember that if you are using the x64 version of VME then you will require the x64 version of Windows Media Encoder V9 ™ or if you are using the 32 bit version (x86) of VME on an x64 system you will still need to install the 32 bit version of Windows Media Encoder V9 ™ rather than the x64 version.
VME Error: There was a problem finding or creating the VME directory.
From = VME
Cause = VME cannot find the VME shared documents directory or create a new directory in shared documents
Tips = This may be a problem with your OS. Make sure you have a public/shared documents folder and that you can create directories in there. On a vista system the shared documents folder sits under C:\Users\Public\Documents\VME, however in Windows XP the shared documen5ts folder sits under C:\Documents & Settings\All Users\Documents.
VME Error: Encoder is not in the correct state to be paused…
From = Windows Media Encoder
Cause = VME has found that the encoder is either stopped or in an invalid state to be paused.
Tips = Something has gone wrong with Windows Media Encoder. Please terminate the VME application and make sure that no Windows Media Encoder and Windows Media Encoder Agent processes are running in the Task Manager. Then restart VME and try using the application again.
Windows Media Encoder Error: Could not stop encoding.
From = Windows Media Encoder
Cause = VME has found that the encoder could not be stopped.
Tips = Something has gone wrong with Windows Media Encoder. Please terminate the VME application and make sure that no Windows Media Encoder and Windows Media Encoder Agent processes are running in the Task Manager. Then restart VME and try using the application again.
VME Error: Encoder not ready.
From = Windows Media Encoder
Cause = VME has found that the encoder object has been destroyed or is not accessible.
Tips = Something has gone wrong with Windows Media Encoder. Please terminate the VME application and make sure that no Windows Media Encoder and Windows Media Encoder Agent processes are running in the Task Manager. Then restart VME and try using the application again.
Windows Media Player Error: Could not open media.
From = Windows Media Encoder
Cause = VME has found that the encoder object has been destroyed or is not accessible.
Tips = Something has gone wrong with Windows Media Encoder. Please terminate the VME application and make sure that no Windows Media Encoder and Windows Media Encoder Agent processes are running in the Task Manager. Then restart VME and try using the application again.
VME Error: Could not obtain profile.
From = VME
Cause = VME cannot use the profile you provided. Either it is corrupt or cannot be found.
Tips = Try using an alternative profile. If the problem still exists try using the profiles in Windows Media Encoder directly. If the still does not work then try reinstalling VME.
VME Error: Encoder is busy…
From = Windows Media Encoder
Cause = VME has found that the encoder object is currently finishing a process.
Tips = This may sometimes occur for more complex video files and codecs. Simply wait 5 seconds and try again. If the problem persists the Windows Media Encoder object may have crashed. If this is the case then terminate the VME application and make sure that no Windows Media Encoder and Windows Media Encoder Agent processes are running in the Task Manager. Then restart VME and try using the application again.
Windows Media Encoder: An attempt to acquire a network resource failed.
From = Windows Media Encoder
Cause = The encoding port (default of 8080) is busy or locked.
Tips = If another application uses this port then simply change the VME Encoder port by selecting “Change Encoding Port…” from the “Tools” – “Settings” menu and enter a free port number. You can use the windows command “netstat –a” in a command prompt to see what ports are in use.
ERROR: An Exception Occurred while Listening :Only one usage of each socket address (protocol/network address/port) is normally permitted
From = VME Web Server
Cause = The VME port (default 5050) is in use.
Tips = If another application uses this port then simply change the VME Server port by selecting “Change VME Port…” from the “Tools” – “Settings” menu and enter a free port number. You can use the windows command “netstat –a” in a command prompt to see what ports are in use.
Windows Media Encoder: One or more required codecs could not be found.
From = Windows Media Encoder
Cause = The encoder could not find a compatible codec on your system.
Tips = I would first uninstall any codecs you have on your system, visit www.free-codecs.com, download FFDShow and XviD and install them both. If you still then get the problem after a restart of the PC I would then recommend downloading a codec pack such as the K-Lite codec pack for Windows XP or the Vista codec pack for Windows Vista. However, I offer no assurances with any codec pack and I personally prefer to find and install the codecs manually. You can use the free tool GSpot to investigate what codecs are required by your videos.
If you are on an x64 machine then obtaining stable codecs is a nightmare. You could try the x64 Vista codec pack (again no assurances), however I experienced a few instability problems with this. I would actually recommend installing the 32 bit (x86) version of VME on your 64 bit machine and then installing the more stable 32 bit codecs. You could then use VME scheduler to convert your DivX and XviD video collection in to 100% x64 compatible WMV format. This would mean no more annoying crashes of Explorer and Media Center.
© Gary Stimson 2007 – Lightning Ware Solutions